1. First of all we need to create a webpart in visual studio (2005, 2008). For that, Go to File>> New>>Project.

2. Under Templates section select WebPart (this option is available only in 2008). For VS 2005, select Class Library and add reference for System.Web.

3. Write code WebPart you want to create. Here, code is written for a label having text “Hello World”.
using System;
using System.Runtime.InteropServices;
using System.Web.UI;
using System.Web.UI.WebControls;
using System.Web.UI.WebControls.WebParts;
using System.Xml.Serialization;
using Microsoft.SharePoint;
using Microsoft.SharePoint.WebControls;
using Microsoft.SharePoint.WebPartPages;
namespace CustomWebPart
{
[Guid("b8f18240-bc27-4f08-a03f-61bd44279d1a")]
public class WebPart1 : System.Web.UI.WebControls.WebParts.WebPart
{
public WebPart1()
{
}
protected override void CreateChildControls()
{
base.CreateChildControls();
Label label = new Label();
label.Text = "Hello World";
this.Controls.Add(label);
}
}
}

4. Now, Buid Webpart and generate an assembly for this webpart. For that GoTo>>Build>>Build Solution. And the GoTo>>Build>>CustomWebPart.

The WebPart is now Build, we need to deploy this assembly in sharepoint site. For deploying webpart we need to perform following steps.
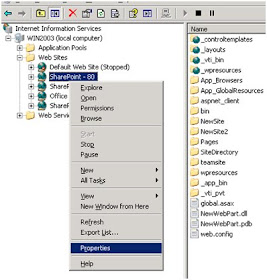
5. Put the assembly in the bin folder of sharepoint site. The MOSS 2007 creates every portal in the inetpub\wwwroot\wss folder. To find the path of bin folder of the portal for which you want to deploy the webpart, identified with port number, run inetmgr(IIS).
Right Click the portal and click on Properties

6. Under HomeDirectory tab, Local Path describes the whole path, copy the path and verify it by opening it in a browser and see if the bin folder exists, if it does not exist then create a new folder and rename it bin.

7. Now copy the assembly from project output folder.
C:\Documents and Settings\Administrator\My Documents\Visual Studio 2008\Projects\CustomWebPart\CustomWebPart\bin\Debug.
Paste it in the portal bin folder. C:\Inetpub\wwwroot\wss\VirtualDirectories\80\bin

Now everytime we change the webpart we need to copy and paste the assembly in portal bin folder. Hence to avoid this stuff we can do the following step which will automatically replace the new assembly in the portal bin folder.
8. In VS .Net, Solution Explorer, Right Click the project name(CustomWebPart) Click on Properties, click on Build. Into the Output Path paste the path which we copied from inetmgr console.

9. Now to make the webpart usable we need to modify the web.config file of the portal. To declare the control safe we need to add a

10. For

Right Click on CustomWebPart and copy Public Key Token.
Open web.config file and enter the following text :
.....
.....
AllowRemoteDesigner="True" />

11. Now we need to Configure Portal to use CustomWebPart.
Till now the web part has been created and deployed to the site directory. Now the next part is how to use the web part on the Portal’s Site. The web part created can be placed on any site of the portal.
Open the portal site in the internet explorer, in my case its http://win2003, ensure that the logged in user has the administrative rights on the portal site, else it will not allow adding the web part.
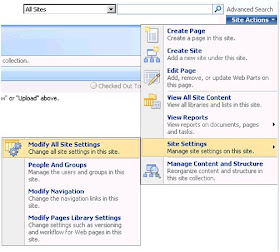
12. Click on the Site Action>>Site Settings

13. On the site settings page under Galleries column click on the Web Parts.

14. On the Web Part Gallery Page click on the New button, to add the new web part assembly to the gallery.

15. On the New Web Parts page locate the CustomWebPart in the list, check the check box on the left and click on the Populate Gallery button the top of the page. This will result in the Web Part entry creation in the Web Part Gallery list, and hence it can be used from now on from the gallery.

Now the Web Part is ready to be added to the page.
16. Open a site created in the Portal. Click on Site Action>>Edit Page

17. This will modify the appearance of the page to enable the edit view. In this view Web Part Zones are highlighted so that a user can add a web part to the zone, Click on the Add a Web Part button in the left zone to add the Web Part.

18. Select the CustomWebPart from the web part list . It is found under the Miscellaneous section and then click on Add.

19. Click on the Exit Edit Mode link on the page and the site will return to the view mode.
20. At the end the page will appear like this.

This is very interesting, You're a very skilled blogger. I have joined your feed and look forward to seeking more of your excellent post. Also, I have shared your website in my social networks!
ReplyDeleteweight loss